
This article may contain affiliate links
Your nails split. They peel. They crack at the edges no matter how carefully you treat them. You blame genetics, diet, or bad luck. But here’s the truth: you’re probably filing them wrong. Improper nail filing is one of the most common causes of weak, damaged nails.
The good news?
Correct filing technique takes just minutes to learn and can transform your nail health dramatically. We’re talking fewer breaks, smoother edges, and nails that actually grow past your fingertips without snapping off.
Why Filing Your Nails the Right Way Matters
Filing seems straightforward—just rub a file against your nail edge, right? Not quite. Understanding what’s happening at the microscopic level changes how you approach this simple task.
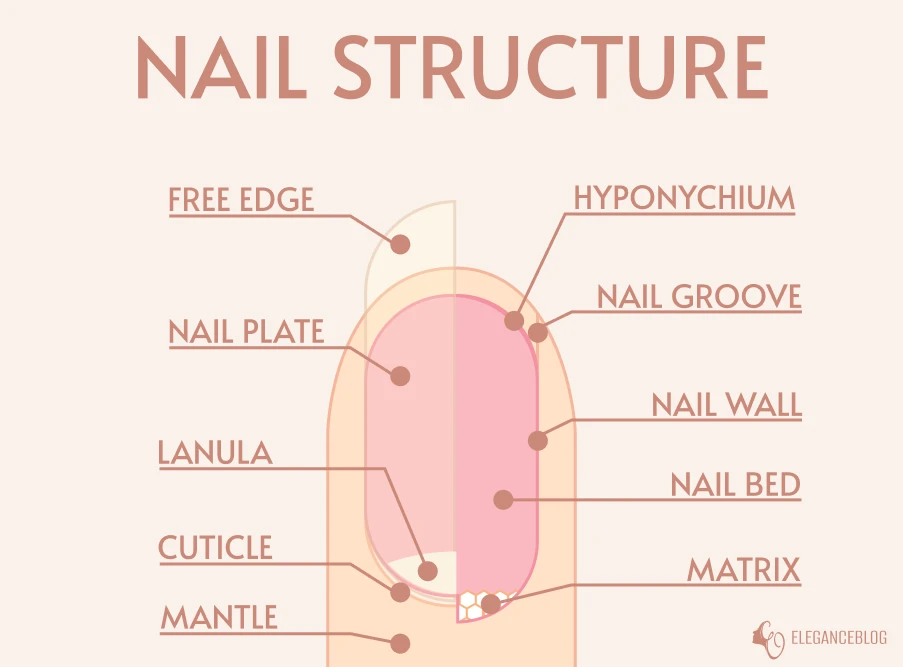
Nail Structure Basics
Your nails consist of keratin layers stacked like roof shingles. These layers run from the base of your nail toward the tip, overlapping as they go. When you file, you’re essentially cutting through these layers.
Filing in the wrong direction or with improper technique doesn’t just shape the nail—it separates those keratin layers. Imagine running your hand against roof shingles the wrong way. You’d lift and separate them. The same thing happens to your nails.
The free edge (the part extending past your fingertip) is particularly vulnerable. It has no nail bed support underneath, making it prone to damage from aggressive or incorrect filing.
Common Problems from Bad Filing Technique
Nail splitting and peeling top the list. When you file back and forth in a sawing motion, you create microscopic tears in the keratin layers. These tears propagate, causing that frustrating peeling effect where thin layers separate from the nail surface.
Weakened sidewalls happen when you over-file the sides. Your nail edges provide structural support. Filing too far inward or too aggressively removes that support, making nails bend and break more easily.
Rough, uneven edges result from using coarse files or filing wet nails. These jagged edges catch on fabric, hair, and surfaces—causing further damage.
Permanent nail damage can occur from chronic improper filing. Repeatedly traumatizing the same areas can affect how the nail matrix (where new nail grows) produces keratin, potentially creating permanent ridges or weak spots.
The solution isn’t avoiding filing—it’s doing it correctly.
What Tools You Need to File Your Nails Correctly
Tool quality dramatically impacts results. Here’s what actually worked for me.
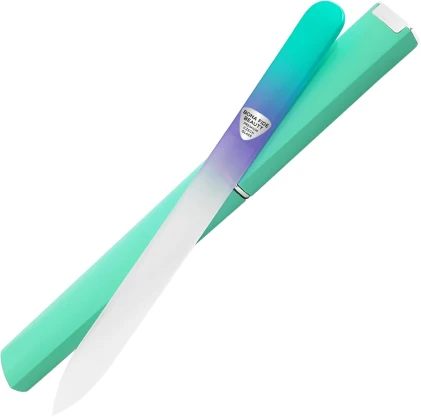
Czech Glass Nail File
Premium crystal nail file designed for natural nails. Gentle but effective, it helps shape, smooth, and strengthen nails without splitting or peeling. Suitable for all nail types: thin, sensitive, normal, or thick.
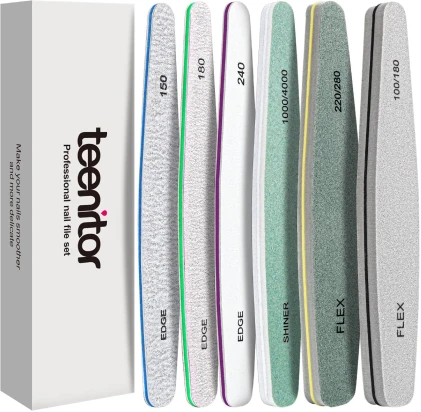
Teenitor Professional Nail File & Buffer Set
Complete nail care set with up to 9 grit options for trimming, shaping, smoothing, and shining nails. Suitable for natural nails, gel, and acrylics. Includes files for precise shaping, buffer blocks for smoothing ridges, and a high-grit polisher for a glossy finish.
Prep: Before You File Your Nails
Proper preparation prevents damage. These steps take two minutes but make enormous difference.
1. Wash and Dry Your Nails Completely
Never file wet nails. This is the single most important rule.
Wet nails are soft and flexible. Water penetrates the keratin layers, causing them to swell and separate slightly. Filing in this vulnerable state tears those layers apart easily, creating the peeling and splitting you’re trying to avoid.
The right approach: Wash hands if needed, then wait at least 15-20 minutes before filing. Your nails need to return to their natural hardness.
If you just showered, wait even longer—30 minutes minimum. Nails absorb significant moisture during showers and baths.
Remove All Polish and Residue
Old polish prevents you from seeing your actual nail edge clearly. You can’t shape accurately when you can’t see what you’re shaping.
Gel polish requires proper removal (soaking and gentle pushing, not aggressive scraping). Wait until gel is completely removed before filing.
Residual oils, lotions, or nail treatments should also be cleaned off. A clean, dry surface allows the file to grip properly.
Clip Excess Length First If Needed
If your nails are very long and you want them significantly shorter, use nail clippers first rather than filing away all that length.
Why: Filing removes tiny amounts with each stroke. Taking off 5mm by filing takes forever and wears out your file quickly. Clippers remove bulk fast.
How to clip correctly:
- Cut straight across in small segments (not one big clip)
- Leave slightly more length than your target—you’ll file to perfection
- Clip from side to side rather than trying to cut the entire nail at once
- Never clip rounded curves—cut straight and file the shape
After clipping, you’ll file to create your desired shape and smooth the edges.
Step-by-Step Technique: How to File Your Nails Correctly
Here’s the method professionals use. Follow these steps exactly for best results.
Step 1 - Choose Your Nail Shape First
Don’t just start filing randomly. Decide on your target shape before touching the file to your nail.
Round: Gentle curve following your fingertip shape. Best for short nails and practical lifestyles. Easy to maintain.
Oval: Slightly elongated version of round with more pronounced curves. Flattering on most finger types. Classic and elegant.
Square: Straight sides with a flat, horizontal edge. Clean and modern. Works best on longer nails.
Squoval: Square base with softened, rounded corners. Combines strength of square with softness of oval. Great everyday shape.
Almond: Tapered sides meeting at a rounded point. Elongates fingers. Requires medium to long nails.
Shape selection tips:
- Short nails → Round or squoval
- Medium nails → Oval, squoval, or almond
- Long nails → Any shape, especially almond or square
- Active lifestyle → Round or squoval (most durable)
- Elegant look → Oval or almond
- Modern aesthetic → Square or squoval
Pick one shape and commit to it before filing. You can always change later, but mixing shapes mid-process creates uneven results.
Step 2 - Hold the File Correctly
The grip: Hold the file like a pencil, with your thumb on top and fingers supporting underneath. This gives you control and prevents excessive pressure.
The angle: Position the file at roughly a 45-degree angle beneath the nail edge. You’re not filing straight into the nail or parallel to it—the angle creates smooth, sealed edges.
The position: Brace your filing hand against something stable. Rest your pinky on the table or against your other hand. Stability prevents jerky motions that create uneven edges.
Step 3 — File in One Direction Only
This is the golden rule of nail filing. Never saw back and forth.
The science: Filing in one direction aligns the keratin layers and seals them. Back-and-forth sawing separates layers and creates tears.
The technique:
- File from the outer edge toward the center
- Lift the file completely
- Return to starting position
- Repeat
Think of it like painting or wood planning—you push in one direction, then reset. You don’t scrub back and forth.
Which direction: Always file from the sidewall toward the center of the nail. Most people file from outside → inside (toward the finger pad).
The exception: Some professionals file from inside → outside. Either works as long as you’re consistent and one-directional.
Step 4 — Start at the Side Walls
Begin with one side of your nail, not the tip.
Left side filing:
- Position file at the left sidewall edge
- File from the sidewall toward the nail center
- Use gentle, smooth strokes
- File until you reach your desired curve or angle
- Typically 3-6 strokes per side
Right side filing:
- Switch to the right sidewall
- File from right edge toward center
- Match the angle and curve of your left side
- Aim for symmetry—same number of strokes often helps
Symmetry check: After filing both sides, look straight at your nail. Do the curves or angles match? If one side looks different, add a stroke or two to balance.
Step 5 — Refine the Tip
For rounded shapes (round, oval):
- File the center in a gentle curve connecting both sides
- Use flowing strokes that follow the circular pattern
- Blend where sidewalls meet the center
For squared shapes (square, squoval):
- Keep the center relatively flat
- For squoval, just barely round the sharp corners
- For pure square, maintain the flat edge
For pointed shapes (almond):
- File at angles from each side toward a center point
- Work gradually to establish the point
- Blend carefully so the transition from sidewall to point looks smooth
How many strokes: Usually 2-4 strokes at the center for most shapes. More if you’re removing significant length.
When to stop: Your nail edge should feel smooth when you run your finger pad across it (filing direction). Any rough spots need additional attention.
Step 6 — Smooth and Seal the Edge
After shaping, you’re not quite done. The filing process, even when done correctly, creates microscopic roughness.
Buffing technique:
- Take your fine buffer or ultra-fine file
- Gently run it along the underside of the free edge
- Use light pressure
- Stroke in one direction
- This seals the keratin layers
The result: When you run your finger along the nail edge, it should feel glass-smooth with no catches or snags.
Final check: Look at your nail from all angles. The edge should appear smooth and uniform. Run it against a piece of fabric—it shouldn’t catch at all.
Common Mistakes When Filing Nails (And How to Fix Them)
Even with instructions, certain errors trip people up. Here’s what to watch for.
Filing Wet or Damp Nails
The mistake: Filing immediately after showering, washing dishes, or swimming.
Why it’s bad: Wet nails are soft and pliable. The keratin layers separate easily, creating peeling and splitting.
The fix: Always wait until nails are completely dry. If you’re unsure, wait an extra 10 minutes. It won’t hurt.
Over-Filing the Sidewalls
The mistake: Filing too far inward on the sides, removing the protective side edges.
Why it’s bad: Those sidewalls provide structural support. Removing them makes nails flexible and prone to breaking.
The fix: Stop filing when you’re 1-2mm from where the nail meets the skin on each side. Maintain some thickness on the sides.
Visual guide: Look at your nail bed (the pink part). Your filed free edge should roughly match that width or be only slightly narrower.
Using the Wrong Grit File
The mistake: Using coarse files (under 180 grit) on natural nails, or fine files on acrylics.
Why it’s bad: Too coarse damages natural nails. Too fine takes forever on artificial nails and wears out the file.
The fix: Match your file grit to your nail type:
- Natural nails: 240-600 grit
- Acrylic/gel: 100-180 grit for shaping, 240+ for refining
How Often Should You File Your Nails?
Filing frequency depends on your nails’ growth rate and your desired length.
For Natural Nails
Weekly maintenance: If you’re maintaining a specific length and shape, light filing once per week keeps edges smooth and shape consistent.
As-needed shaping: If you’re growing your nails out, you might only file every 2-3 weeks when you notice uneven edges or snags.
After breaks: Immediately file any broken nail to prevent further damage. Even if you just filed yesterday, a break creates sharp edges that’ll cause more problems if ignored.
For Acrylic or Gel Nails
Every 2-3 weeks: When you go for fills, your technician files to remove shine, reshape, and blend new growth.
Between appointments: Minimal filing needed unless you have a break or lifting. Avoid filing the surface yourself—you might remove too much and weaken the enhancement.
Signs You Need to File
- Rough or snaggy feeling when you run nails across fabric
- Visible chips or uneven areas on the free edge
- Nails catching on hair or clothing
- Uneven lengths that bother you visually
- Sharp corners that poke your skin
Don’t over-file: Some people file constantly, removing tiny amounts daily. This is unnecessary and can thin your nails over time. Once or twice weekly is plenty for most people.
FAQ
Short answer: No, wait until they're completely dry.
Full explanation: Showering saturates nails with water, making them soft and pliable. Filing in this state tears keratin layers rather than cleanly cutting them. Wait at least 20-30 minutes after bathing before filing. Your nails need time to release absorbed moisture and return to their normal hardness.
If you must file soon after bathing, thoroughly dry nails with a towel and use a blow dryer on cool setting for 30 seconds per hand. This speeds drying but waiting naturally is still better.
Always file before polish.
Filing shapes the nail. Polish goes onto the already-shaped surface. If you file after polishing, you'll remove the polish from the edges and create an uneven appearance.
Proper sequence:
- Remove old polish completely
- File and shape nails
- Buff if desired
- Clean nails with alcohol or polish remover to remove oils
- Apply base coat, polish, and top coat
Filing after polish also creates polish dust that contaminates your manicure.
No, filing doesn't affect growth rate.
Nails grow from the matrix beneath your cuticle. Filing only affects the dead portion extending past your fingertip. These two areas have no connection.
What actually affects nail growth:
- Genetics (biggest factor—some people's nails just grow faster)
- Age (growth slows with aging)
- Health and nutrition
- Circulation (better blood flow to fingertips helps)
- Hormones (pregnancy often speeds growth)
Filing prevents breaks, which means you retain more length as nails grow—creating the illusion of faster growth. But the actual growth rate stays the same.
If you filed unevenly: Work on the longer or less-filed side to match the other side. File conservatively—you can always remove more but can't add back what you've taken.
If you filed too short: Nothing fixes this immediately—you need to wait for growth. In the meantime, keep edges smooth with gentle buffing and use strengthening treatments to prevent breaks.
If you created rough edges: Go over the edge again with a fine-grit file or glass file, using one-directional strokes. Follow with buffing.
If you over-filed the sidewalls: Let them grow back. Avoid filing sides on future growth until width is restored.
Gel nails: You can gently file the free edge to maintain shape between appointments. Use a fine file (240 grit or higher). Never file the top surface—you'll break the seal and cause lifting.
Acrylic nails: Filing the edges is fine with a medium file (180-240 grit). Avoid filing where acrylic meets natural nail—you might damage the natural nail underneath. Never file the surface unless you're experienced.
Best approach: For both, stick to minimal edge maintenance. Save significant shaping for professional appointments.
